
0
Downloads
0
Episodes
Miiduu.com FAQ
Episodes
Aug 1, 2012
Aug 1, 2012
1. Why my customers are not directed to Paypal to finish the payment? URL forwarding and Frame for your own domain are not allowed by Paypal, which is regarded as insecure. You may need to set your own domain via standard steps. 2. My paypal orders don't show up PayPal sometimes experiences delays in their IPN (Instant Payment Notification) service which is the mechanism used to tell Miiduu about completed orders. Delays can range from a few minutes to several hours. If the orders still don't show up, you should deliver products based the payment record in your Paypal account. You may find your missing orders under menu: Sales->Order->Missing order. IPNs are only part of the Website Payments Standard package. Website Payments Pro does not have this issue and all orders should show up immediately. 3. Currency Issue If your default currency is not USD (as default currency in Paypal), you need to confirm that your currency is accepted by Paypal. What's more, make sure the currency code in your dashboard (System->Localisation->Code) is in accord with Paypal. 4.This transaction cannot be processed due to an invalid merchant configuration. Please complete the following checklist: 1) Make sure you've signed up with PayPal for PayPal Website Payments Pro. This is a services provided on top of the standard PayPal package and costs approximately 30$ USD a month. 2) Make sure that you have accepted the "PayPal Payments Pro" agreement in your PayPal account after you have been approved by PayPal for PayPal Payments Pro. If still got the same error then: 3)Logged into PayPal account. Went to “Profile” then "My selling tools” then "API access”, "View API Signature”. Removed the API Signature and recreated it. Back to your miiduu account and input new API informations. 5.The seller accepts encrypted website payments only. You cannot pay the seller through un-encrypted buttons. Please contact your seller for more details. You Need ToTurn Off the PayPal Encrypted Website Payments Feature 1)Log in to your PayPal account. 2)Click Profile. 3)From the Selling Preferences column, click Website Payment Preferences. 4)In the Encrypted Website Payments section, select Off. 5)Click Save.
Jan 26, 2011
Jan 26, 2011
Before starting, make sure you have set up your GeoZones. Once that is done, you're ready to set up your tax rates! First, navigate to System -> Localisation -> Tax Classes. Next you'll click the "Add" button. Then enter the "Tax Class Title" and "Description" for this tax rate. This is just for you, so name this tax class something you will easily recognize. Next click "Add Tax Rate" Select the GeoZone you'd like to apply this tax rate to. "Priority" come to play its role when the shipping address applies to two or more than two of your tax rates. For example, you have set up two tax rates, one for the United States, the other for New York City. If a customer comes from New York City, then priority of the tax rate will decide how much tax he has to pay. Then just fill out the form and click save. You can enter as many different tax rates as you'd like. Once you have set up your tax rates, make sure to go back to your products and apply the tax rate to each one. Because products can all have different tax rates, this will need to be done individually. If you forget to apply the tax rate to the product, it will be sold tax free.
Jan 17, 2011
Jan 17, 2011
To set your store up to accept PayPal payments, click the "System" tab, and then select "Payments". On the payment screen, select the "Edit" link for PayPal. Enter your PayPal account's e-mail and then make sure to change the status from Disabled to Enabled. You can also change the default order status for PayPal purchases, or switch your account into or out of test mode.


Jan 9, 2011
Jan 9, 2011
To set up Geo Zones, navigate to System -> Localisation -> Geo Zones. Click on the Add button in the top right corner. There you will be asked to fill in the name and description of the Geo Zone. For example you might have a Geo Zone named "The West Coast" and the description could be "US States on the West Coast", or whatever will help you remember. Then click "Add Geo Zone" and select the appropriate country. If you are creating a Geo Zone for the country as a whole, you are done, just click Save. If you would like to chose a particular state or region, click the next drop down box and select the state or region you would like to include. You can continue to add regions in this way until your Geo Zone is complete. Then click Save. You can create as many Geo Zones as you would like!
Oct 21, 2010
Oct 21, 2010
Setting up your MiiDuu store to accept payments through your 2Checkout account is easy. Under the System tab, select Payments. To the right of where it says 2Checkout, click Edit. Then you just need to fill out your account information and preferences. Make sure to switch the payment method to "Enabled" if you would like to make this option available for your customers.
If you do not already have a 2Checkout account, or you account hasn't been activated yet, the nice people over at 2Checkout have provided the following information to make the process as easy as possible:
Step 1) Sign up for an account and pay the $49 sign up fee
Step 2) From there you will receive a welcome email containing the required SIF, or Supplier Identification Form to be printed off, filled out, and either emailed back to newaccounts@2co.com or faxed in with the Vendor ID # received from the account sign up. Once received, you will need to allow at least 48-72 hrs for review of the website and/or services offered on the website listed in the account. If accepted by 2Checkout's Risk Department, then you will be notified via email and the account status can be set to live to begin receiving sales.
Step 3) You need to place the website disclaimer necessary to determine who is providing the securely hosted checkout page, 2Checkout.com, and there needs to be a working refund policy, along with a privacy policy visible on your site.
Here are some quick links to answer any other questions you might have on the 2Checkout end:
User Management
Site Management
Options for receiving payment via 2Checkout.com
Creating your Payment Profile and Banking information
Sample 2Checkout.com Fraud Review
The Verification Process at 2Checkout.com
Direct Return
What Type of Compliance Disclaimer Must I put on my Website?
Oct 7, 2010
Oct 7, 2010
One of the great features of your MiiDuu store is the ability to allow customers checkout through Google Checkout. This is a popular shopping cart system, so it will be very easy and convenient for your customers to use. If you do not already have a Google Checkout account, you will first want to set one of those up. You can do so by going to checkout.google.com and clicking on the blue Sign Up button in the lower right corner. You will be asked to fill out some information about your company, and once you complete the checkout processes, you will be given a Merchant ID and Merchant Key. Once you have this information, go into your MiiDuu account and select Payments under the System tab. Then click on Edit in the Google Checkout column and enter your Merchant ID and Merchant Key. Make sure to select Enabled from the Status drop down box. Once this is set up, you will be able to start selling in Google! Some important things to remember about Google Checkout: 1) Your customers will not be required to login to your site, and the Google Checkout option will only show up in the shopping cart. 2) The entire checkout process takes place within Google, not your MiiDuu store. 3) Your payment and shipping methods are NOT linked to your Google Checkout account, so you will need to set up your Google Account separately.
Sep 1, 2010
Sep 1, 2010
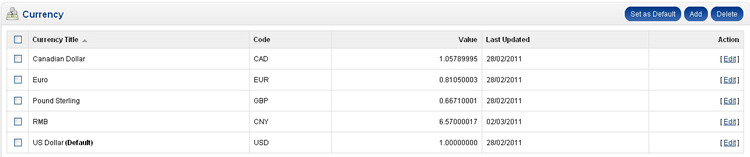
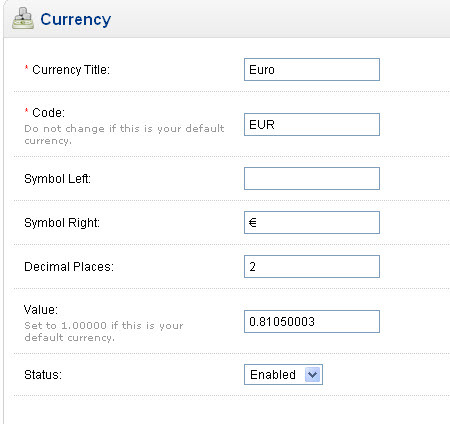
Changing the currency of your store is simple. Just go to "System" and click on "Localization". Then click "Currencies". You will see a list of our default currencies. Check the one you would like to use as your default currency, and then click "Set as Default". Note that when you do this that currency will automatically be set as "1.0" and you will need to update the exchange rates. You can do this by editing each of the currencies. This will be important for international customers who choose to view your site in a different currency. If you do not see the currency you would like to use listed, click "Add" and then fill out the form. Set this currency as your default and update the exchange rates. Our system allows you to add as many currencies as you would like, and use and currency as your default currency. Once you have updated your default currency, make sure to adjust any prices for your products. When pricing a product you will enter the price in the default currency, so any changes to your default currency will affect the pricing of your products.
Aug 31, 2010
Aug 31, 2010
To enable or disable the different forms of payment simply select the "Settings" tab and then click on "Payment", where you will see the list of payment options. Click "Edit" on the form of payment you would like to enable/disable and change the status in the drop down menu. If you are enabling a particular payment method, make sure to fill out the form with the correct information to ensure you receive all your payments!