0
Downloads
0
Episodes
Miiduu.com FAQ
Episodes
Wednesday Feb 15, 2012
Wednesday Feb 15, 2012
Generally speaking, in order to make product image look clear, you have to upload images no small than 300*300 px. However, sometimes, optimum size for product image depends on the theme you are using. Once you have activated a theme, please go to system->settings->image and hover your mouse on the question mark after "Use theme default image" and Product Image Thumb Size will display then. That is the optimum size for the theme you are using. Size of the image you upload should be no smaller than that size (if bigger, remember to keep same length:width ratio). Also, you may choose not to use default image size of the theme and change it below.
Thursday Feb 10, 2011
Thursday Feb 10, 2011
Importing products is simple with a CSV file! Just follow these easy steps and upload all your products in one go. 1. Navigate to Catalog -> Products and click "Import" 2. If you would like to upload images with your products, you will first want to upload all of the images into your image directory. You will see a link on the import product page that says "Click here to batch upload images". Click on that link and you will be taken to your Image Manager. Click batch upload and then select the images you would like to upload. 3. You will also see a link to download a Sample CSV file. The easiest thing to do is download this file and then replace the sample information with your information. The top row tells you what information should be entered in the column below and if it is required or not (for example Product Name (Required), Attributes (Optional), etc). In the following rows you will see a few examples of how the information should be entered. Just replace these examples with your actual product information (in the same format) and save your updated document. 4. Upload your updated CSV file! Helpful Hints: You should upload product images, set up categories, attributes(if you have), and variations(if you have), tax(if you have) beforehand. Click here to see how to setup attributes and variations. When importing product images you will need to include the full path (except for the main Images folder). For example, if you have an image named tshirt1.jpg and it's in a folder called tops you will need to enter the image as tops/tshirt1.jpg, so it is a good idea to take note of the folders your images are in while in the image manager to make things easier as you enter your product information for uploading. Anything that isn't marked as Required can be left blank, if desired. If you leave a field blank, your product will automatically use the default for that field. You can use HTML tags when entering your product description. When entering attributes, you will enter them as attribute=value. For example, if one of your attributes is labeled "material" and one of values for that attribute is "cotton" you would enter this as "material=cotton". Use the "|" (Shift + \) key as a separator between attributes. When entering variations, remember that you will need to fill out the details for every variation available. For example, if you have two sizes (small and large) and two colors (white and black), you will need to fill out the information for 4 products (small white, small black, large white, large black). This is done in the following format: color=black&size=small&mprice=59.95&mquantity=45 with the "|" separator between each variation. When importing large quantity of products , we highly recommend you to import few of them at first, check the result and make sure the products imported successfully. Then, go on.
Wednesday Jan 26, 2011
Wednesday Jan 26, 2011
Before starting, make sure you have set up your GeoZones. Once that is done, you're ready to set up your tax rates! First, navigate to System -> Localisation -> Tax Classes. Next you'll click the "Add" button. Then enter the "Tax Class Title" and "Description" for this tax rate. This is just for you, so name this tax class something you will easily recognize. Next click "Add Tax Rate" Select the GeoZone you'd like to apply this tax rate to. "Priority" come to play its role when the shipping address applies to two or more than two of your tax rates. For example, you have set up two tax rates, one for the United States, the other for New York City. If a customer comes from New York City, then priority of the tax rate will decide how much tax he has to pay. Then just fill out the form and click save. You can enter as many different tax rates as you'd like. Once you have set up your tax rates, make sure to go back to your products and apply the tax rate to each one. Because products can all have different tax rates, this will need to be done individually. If you forget to apply the tax rate to the product, it will be sold tax free.
Monday Jan 17, 2011
Monday Jan 17, 2011
To upload multiple products at once, navigate to Catalog -> Products and click "Import Products". On this page you will upload a CSV file with all of your product information in it. You can also find a sample CSV file on this page. Note that you will need to include the entire file path for any images you upload, for example: C:\Documents and Settings\All Users\Documents\My Pictures\Sample Pictures. You can upload up to 5 images per product through a CSV file. Any additional images, and any attributes and variations will need to be done manually.
Thursday Dec 02, 2010
Thursday Dec 02, 2010
Step 1. Activate digital sales by agreeing to the terms and conditions. You can do this by selecting "Sell Downloads" under the "System" tab. Step 2. Upload your digital products. Once you have agreed to the terms and conditions, you will see a "Downloads" options under the "Catalog" tab. Go here and upload any files you would like to sell in your MiiDuu store. Here you will also select how many times a customer can download the file for each purchase. Step 3. Create a product. Now create a new product (Catalog -> Products -> Add) and name your product. You will then see a list of your digital downloads, and you can select which file(s) to sell. Fill out the rest of the product information as usual. Click save, and you're done! Your digital product is now for sale on your website! When a customer purchases the product, it will not be available until the payment is confirmed by either you or the 3rd party payment solution (PayPal, etc). Once payment is confirmed, they can access their account page on your store, and click "Downloads", where they will be able to download the product and see how many downloads they have remaining. At present, multimedia formats supported by miiduu.com are as follows: 'jpg', 'gif', 'mp3', 'm4a', 'ogg', 'mp4', 'm4v', 'mpg', 'mov', 'avi', 'flv', '3g2', '3gp', 'wmv', 'pdf', 'doc', 'xls', 'ppt', 'zip'. Note: For digital downloads, customers cannot use guest checkout when they finishing buying products. You may go to System-> Settings and shut guest checkout donw in option tab.
Thursday Oct 28, 2010
Thursday Oct 28, 2010
MiiDuu lets you add multiple images for each product, which allows you to show the customer an item from various views or in different variations. Adding extra images is easy. When you are adding or editing a product, simply click the "Image" tab and you will be able to upload as many images as you want!
Tuesday Aug 31, 2010
Tuesday Aug 31, 2010
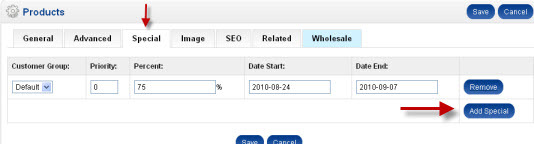
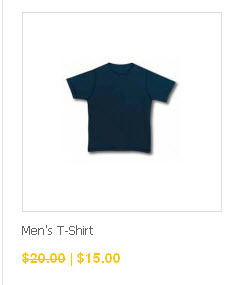
Of course! To put an item on sale, simply click on the "Special" tab when creating or editing it. Click "Add Special" and then fill in the percentage and dates of the sale. NOTE: The percentage is the percentage of the total price the customer will pay, NOT the percentage of discount. For example, if your product is $100 and you enter 75%, the product will cost the customer $75.
Tuesday Aug 31, 2010
Tuesday Aug 31, 2010
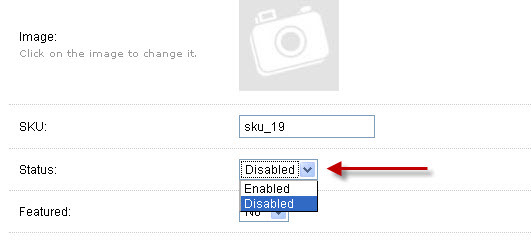
To keep a product from being shown on the website, simply select "Disable" from the drop down box labeled "Status" when adding or editing a project. Your product information will be saved, and whenever you're ready to put the product back in your store, just change the status back to "Enabled". It's that easy!
Tuesday Aug 31, 2010
Tuesday Aug 31, 2010
Yes, from the "Catalog" tab you can select "Manufacturers". Then just click on "Add" and fill in the name of the manufacturer you would like to add. Repeat until you have created all of the manufactures you would to list. Then, when you are creating or editing a product, simply click on the "Advanced" tab and select the manufacturer from the drop down box. Customers will then be able to see who manufactured the product, as well as click on the name of the manufacturer and see any of their other products that you sell!
Tuesday Aug 31, 2010
Tuesday Aug 31, 2010
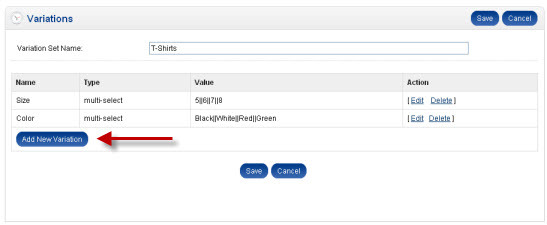
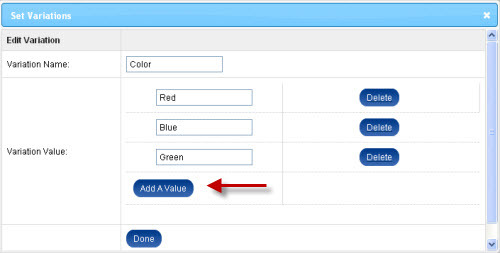
Variations, things such as size and color, are easy to add and use with MiiDuu! From your administration page select the "Catalog" tab, and click on "Variations". To set up variations, just follow these simple steps: 1. From your administration page select the "Catalog" tab, and click on "Variations". 2. To create a variation set, click on the "Add" button. 3. Name your variation set. 4. Click "Next, Add Variation". 5. Fill out the form with the variation name and the variation values. You can continue to add variations until you are satisfied with the variation set. Also you can select display mode here. Click on done when everything is OK. Currently three kinds of special characters are compatible in variation values, namely hyphen, full stop and space. For example, you may put USB- driven, 5.5 or dark blue in variation values. 6. Once you are happy with your variation set, click on the Save button. 7. Click the set category link to apply your variation set to a category or create a new category. 8. Navigate to Catalog -> Products. 9. Select a product within the category you have chosen and click edit. You will now see a section for variations. For new products, your variation options will appear as soon as you select a category. 10. Check the appropriate boxes for the variations available for the product. Click save. NOTE:The relation between category and variations is that a category can only be linked to one variation set. However, you may add multiple variations in one variation set. Each variation set needs to be linked to a category in order to use it. Since each category gets one variation set, make sure you enter all of the variations available for all of the products within that category. For example, if you have a category name Handbags with two handbags in it, and one uses a variation so the customer can pick the color, and the other uses a variation where the color picks the material, both the "Color" and "Material" variations need to be in your variation set for Handbags.